Replacing Flux Bootstrap with the Flux Operator: GitOps on Autopilot Mode

Managing Flux CD in production used to mean running flux bootstrap, committing hundreds of lines of generated YAML, and then manually coordinating upgrades across clusters. With the Flux Operator, all of that is replaced by a single Kubernetes custom resource — the FluxInstance — that declares your entire Flux installation as code.
In this post, we walk through how we migrated from the traditional Flux bootstrap approach to the Flux Operator on a GKE Autopilot cluster, managed entirely with Terraform.
What is the Flux Operator?
The Flux Operator is a Kubernetes controller developed by ControlPlane that manages the lifecycle of Flux CD installations. Instead of bootstrapping Flux with the CLI (which generates and commits gotk-components.yaml and gotk-sync.yaml into your repo), you install the operator once and then declare a FluxInstance custom resource that describes what you want.
The operator handles:
- Installation of all Flux controllers (source, kustomize, helm, notification, image reflector, image automation)
- Upgrades — change the version in the FluxInstance spec, and the operator rolls out the new Flux distribution
- Configuration — network policies, multi-tenancy, secret decryption, resource limits, and Kustomize patches are all part of the CRD
- A built-in Web UI — a lightweight, mobile-friendly dashboard for monitoring your GitOps pipelines
Think of it as the difference between imperatively running apt install and declaring a package in a Nix flake. The Flux Operator makes Flux itself GitOps-managed.
Links:
What is Flux CD?
For those unfamiliar, Flux CD is a CNCF Graduated GitOps toolkit for Kubernetes. It continuously reconciles the state of your cluster with declarations stored in a Git repository. When you push a change to your GitOps repo, Flux detects it and applies it to the cluster — no kubectl apply needed.
Flux is composed of specialized controllers:
| Controller | Purpose |
|---|---|
| source-controller | Fetches manifests from Git repos, Helm charts, OCI artifacts, and S3 buckets |
| kustomize-controller | Applies Kustomize overlays and plain YAML to the cluster |
| helm-controller | Manages HelmRelease lifecycle (install, upgrade, rollback, test) |
| notification-controller | Sends alerts to Slack, Teams, webhooks, and receives webhooks from Git providers |
| image-reflector-controller | Scans container registries for new image tags |
| image-automation-controller | Automatically commits new image tags back to the GitOps repo |
Flux graduated from the CNCF in November 2022, joining the ranks of Kubernetes, Prometheus, and Helm.
Links:
The Problem with Flux Bootstrap
The traditional way to install Flux is flux bootstrap github. This generates two files committed to your GitOps repo:
gotk-components.yaml— a ~660KB file containing all Flux controller manifests, CRDs, RBAC rules, and namespacesgotk-sync.yaml— a GitRepository + Kustomization that points Flux at itself
This works, but it has downsides:
- Massive generated files —
gotk-components.yamlis 660KB of YAML you never edit but always diff - Imperative upgrades — to upgrade Flux, you re-run
flux bootstrap, which regenerates the components file and creates a commit - No declarative configuration — secret decryption, resource limits, and patches require manual Kustomize overlays on top of the generated files
- Hard to manage with Terraform — the bootstrap process is designed for CLI usage, not infrastructure-as-code
Installing the Flux Operator with Terraform
We package the entire Flux setup as a reusable Terraform module (modules/flux-operator/) that handles four concerns: namespace, secrets, the operator itself, and the FluxInstance declaration. Here’s a walk-through of each resource and why it exists.
Step 1: Namespace and Secrets
Before anything else, the module creates the flux-system namespace and two Kubernetes secrets — one for Git repository access, and optionally one for SOPS decryption:
# The namespace where all Flux components live
resource "kubernetes_namespace" "flux_system" {
  metadata {
    name = "flux-system"
  }

  lifecycle {
    # Flux controllers add their own labels/annotations — don't fight them
    ignore_changes = [metadata[0].labels, metadata[0].annotations]
  }
}

# Git SSH credentials — used by source-controller to pull from the GitOps repo
resource "kubernetes_secret" "flux_system" {
  metadata {
    name      = "flux-system"
    namespace = kubernetes_namespace.flux_system.metadata[0].name
  }

  data = {
    "identity"     = var.git_ssh_key      # SSH private key (sensitive)
    "identity.pub" = var.git_ssh_key_pub  # SSH public key
    "known_hosts"  = var.known_hosts      # GitHub SSH host key fingerprint
  }

  type = "Opaque"
}

# SOPS age key for decrypting secrets in Git (optional)
resource "kubernetes_secret" "sops_age" {
  count = var.age_key != "" ? 1 : 0

  metadata {
    name      = "sops-age"
    namespace = kubernetes_namespace.flux_system.metadata[0].name
  }

  data = {
    "age.agekey" = var.age_key  # Age private key (sensitive)
  }

  type = "Opaque"
}
The lifecycle.ignore_changes on the namespace is important — Flux controllers add labels and annotations during reconciliation, and without this directive Terraform would try to remove them on every apply, creating an endless drift loop.
The SOPS secret is conditionally created (count = var.age_key != "" ? 1 : 0) so environments without encrypted secrets don’t need to provide an age key.
Step 2: Install the Operator via Helm
The Flux Operator is distributed as an OCI Helm chart. A single helm_release installs the operator CRDs and controller:
resource "helm_release" "flux_operator" {
  name       = "flux-operator"
  repository = "oci://ghcr.io/controlplaneio-fluxcd/charts"
  chart      = "flux-operator"
  namespace  = kubernetes_namespace.flux_system.metadata[0].name
  version    = var.flux_operator_version  # Pin to your tested version
  wait       = true  # Wait for CRDs before proceeding

  # Enable the built-in Web UI
  set {
    name  = "web.enabled"
    value = var.web_ui_enabled ? "true" : "false"
  }

  depends_on = [kubernetes_namespace.flux_system]
}
Setting wait = true is critical — the next resource creates a FluxInstance custom resource, and the CRD must exist before Terraform can apply it. Without wait, Terraform would race ahead and fail with “no matches for kind FluxInstance”.
Step 3: Declare the FluxInstance
This is the heart of the module. A single kubectl_manifest resource declares everything about your Flux installation — which controllers to run, where to sync from, and how to configure them:
resource "kubectl_manifest" "flux_instance" {
  yaml_body = <<-YAML
    apiVersion: fluxcd.controlplane.io/v1
    kind: FluxInstance
    metadata:
      name: flux
      namespace: flux-system
    spec:
      distribution:
        version: "${var.flux_version}"
        registry: "ghcr.io/fluxcd"
      components:
        - source-controller
        - kustomize-controller
        - helm-controller
        - notification-controller
        - image-reflector-controller
        - image-automation-controller
      cluster:
        type: kubernetes
        size: small
        multitenant: false
        networkPolicy: true
        domain: "cluster.local"
      sync:
        kind: GitRepository
        url: "ssh://git@github.com/${var.github_owner}/${var.github_repository}.git"
        ref: "refs/heads/${var.github_branch}"
        path: "clusters/${var.cluster_name}"
        pullSecret: "flux-system"
      kustomize:
        patches:
          # SOPS decryption for all Kustomizations
          - patch: |
              - op: add
                path: /spec/decryption
                value:
                  provider: sops
                  secretRef:
                    name: sops-age
            target:
              kind: Kustomization
          # GKE Autopilot requires seccompProfile on all pods
          - patch: |
              - op: add
                path: /spec/template/spec/securityContext
                value:
                  seccompProfile:
                    type: RuntimeDefault
            target:
              kind: Deployment
          # Right-size controller resource requests
          - patch: |
              apiVersion: apps/v1
              kind: Deployment
              metadata:
                name: source-controller
              spec:
                template:
                  spec:
                    containers:
                      - name: manager
                        resources:
                          requests:
                            cpu: 20m
                            memory: 32Mi
            target:
              kind: Deployment
              name: source-controller
          # ... similar patches for each controller
  YAML

  depends_on = [
    helm_release.flux_operator,
    kubernetes_secret.sops_age,
    kubernetes_secret.flux_system
  ]
}
We use the gavinbunney/kubectl provider instead of kubernetes_manifest because it handles CRD-based resources more reliably — kubernetes_manifest requires the CRD to exist at plan time, which creates a chicken-and-egg problem when the CRD is installed by the Helm chart in the same apply.
The depends_on chain ensures correct ordering: namespace first, then secrets, then the Helm chart (which installs the CRD), and finally the FluxInstance that uses all of them.
A few things to note about the sync section:
path: "clusters/${var.cluster_name}"— each cluster gets its own directory in the GitOps repo. This is the standard Flux pattern for multi-cluster setups.pullSecret: "flux-system"— references the SSH secret created in Step 1. The source-controller uses this to authenticate with GitHub.ref: "refs/heads/${var.github_branch}"— typicallymainin production. You can point a staging cluster at a different branch for testing GitOps changes before they hit production.
Step 4: Wire It All Together
The root Terraform configuration invokes the module conditionally:
module "flux_operator" {
  source = "./modules/flux-operator"
  count  = var.enable_flux ? 1 : 0

  cluster_name      = var.cluster_name
  github_owner      = var.github_owner
  github_repository = var.github_repository
  github_branch     = var.github_branch
  git_credentials   = var.git_credentials
  web_ui_enabled    = true

  depends_on = [module.gke]
}
The depends_on = [module.gke] is essential — the module needs a working Kubernetes cluster and valid credentials before it can create namespaces and install Helm charts.
The count = var.enable_flux ? 1 : 0 toggle lets you disable GitOps for specific environments (e.g., a dev cluster that doesn’t have a corresponding directory in the GitOps repo yet).
What Happens on terraform apply
The full sequence:
terraform apply
  1. module.gke creates the Kubernetes cluster
  2. module.flux_operator creates:
     a. flux-system namespace
     b. Git SSH credentials secret
     c. SOPS age key secret (if provided)
     d. Helm release: flux-operator (installs CRDs + operator pod)
     e. FluxInstance CR (operator reads this and deploys 6 Flux controllers)
  3. Flux source-controller clones the GitOps repo via SSH
  4. Flux kustomize-controller reads clusters/<name>/kustomization.yaml
  5. All referenced infrastructure and apps are reconciled to the cluster
From a cold start to a fully GitOps-managed cluster in a single terraform apply. Subsequent changes to the cluster are made by pushing to the GitOps repo — Terraform only manages the Flux installation itself, not the workloads.
Managing Secrets in GitOps
One of the first questions when adopting GitOps is: how do you store secrets in Git? You can’t commit plaintext Kubernetes Secrets, but you also want your entire cluster state to be version-controlled. The FluxInstance’s kustomize.patches section makes it easy to wire up whichever decryption provider you choose.
Option 1: SOPS + age (What We Use)
Mozilla SOPS encrypts YAML values in-place, leaving keys and structure readable while encrypting the values. Combined with age for key management, it’s the simplest approach — no external infrastructure required.
How it works:
Generate an age key pair:
Bashage-keygen -o age.agekey # Public key: age1ql3z7hjy54pw3hyww5ayyfg7zqgvc7w3j2elw8zmrj2kg5sfn9aqmcac8pEncrypt secrets before committing:
Bashsops --age=age1ql3z7hjy54pw3hyww5ayyfg7zqgvc7w3j2elw8zmrj2kg5sfn9aqmcac8p \ --encrypt --in-place secret.yamlStore the private key as a Kubernetes secret:
HCLresource "kubernetes_secret" "sops_age" { metadata { name = "sops-age" namespace = "flux-system" } data = { "age.agekey" = var.age_private_key # From Terraform variables (sensitive) } }Tell Flux to decrypt using SOPS — via the FluxInstance’s kustomize patches:
YAMLkustomize: patches: - patch: | - op: add path: /spec/decryption value: provider: sops secretRef: name: sops-age target: kind: Kustomization
Flux’s kustomize-controller decrypts on the fly during reconciliation. The Git repo only ever contains encrypted values.
Pros: Zero external dependencies, works offline, easy to audit, keys are just files. Cons: Key distribution is manual (you must get the age private key to each cluster), no automatic key rotation.
SOPS also supports AWS KMS, GCP KMS, Azure Key Vault, and HashiCorp Vault as key backends — so you can use age for development and a cloud KMS in production.
Option 2: HashiCorp Vault + External Secrets Operator
For organizations already running HashiCorp Vault, the External Secrets Operator (ESO) bridges Vault and Kubernetes. Instead of encrypting secrets in Git, you store references.
How it works:
- Secrets live in Vault (never in Git)
- You commit
ExternalSecretmanifests that reference Vault paths:YAMLapiVersion: external-secrets.io/v1beta1 kind: ExternalSecret metadata: name: my-app-secrets spec: refreshInterval: 1h secretStoreRef: name: vault-backend kind: ClusterSecretStore target: name: my-app-secrets data: - secretKey: db-password remoteRef: key: secret/data/my-app property: db-password - ESO syncs secrets from Vault into Kubernetes Secrets
- Flux manages the
ExternalSecretmanifests like any other resource
Pros: Centralized secret management, automatic rotation, rich access policies, audit logging. Cons: Requires running Vault (or Vault-as-a-service), adds operational complexity, ESO is another controller to manage.
Option 3: Sealed Secrets
Sealed Secrets by Bitnami takes a different approach: you encrypt secrets with the cluster’s public key, producing a SealedSecret CRD that’s safe to commit. Only the cluster’s controller can decrypt it.
kubeseal --format yaml < secret.yaml > sealed-secret.yamlPros: Simple, no external dependencies, cluster-bound encryption. Cons: Secrets are tied to a specific cluster (can’t share across clusters without re-sealing), key rotation requires re-encrypting all secrets, no centralized management.
Option 4: Cloud Provider KMS + CSI Driver
If you’re running on a major cloud, you can use the provider’s native secret manager with the Secrets Store CSI Driver:
| Cloud | Secret Manager | CSI Provider |
|---|---|---|
| GCP | Secret Manager | GCP Provider |
| AWS | Secrets Manager | AWS Provider |
| Azure | Key Vault | Azure Provider |
Secrets are mounted as volumes — no Kubernetes Secret objects at all. This is the most secure option since secrets never exist in etcd, but it requires cloud-specific configuration and doesn’t work in a multi-cloud or on-prem setup.
Which One Should You Choose?
| Approach | Complexity | External Deps | Multi-cluster | Rotation |
|---|---|---|---|---|
| SOPS + age | Low | None | Manual key distribution | Manual |
| SOPS + Cloud KMS | Low | Cloud KMS | Key per cluster/project | Automatic (KMS) |
| External Secrets + Vault | Medium | Vault + ESO | Centralized | Automatic |
| Sealed Secrets | Low | None | Re-seal per cluster | Manual |
| CSI Driver | Medium | Cloud-specific | Per-cloud config | Automatic |
For small teams and single clusters, SOPS + age is hard to beat — zero infrastructure overhead. As you scale to multiple clusters or need automated rotation, External Secrets + Vault or SOPS + Cloud KMS are worth the additional complexity.
Resource Optimization for GKE Autopilot
GKE Autopilot bills based on resource requests, so right-sizing Flux controllers directly impacts cost. The Kustomize patches in our FluxInstance (shown in Step 3 above) request minimal CPU and memory per controller.
An important caveat: GKE Autopilot enforces minimum resource requests per container — currently 50m CPU and ~52Mi memory. If you request less, Autopilot silently bumps it to the floor. The patches are still valuable because they prevent the default Flux requests (which are significantly higher) from being used as the baseline. The end result is that the entire Flux GitOps infrastructure — all 6 controllers — runs on well under half a CPU core, which is modest for what you get.
The Built-in Web UI
One of the nicest features of the Flux Operator is its built-in web dashboard. Unlike the older community Capacitor UI or the deprecated Weave GitOps UI, this one ships embedded in the operator itself — no additional installation required.
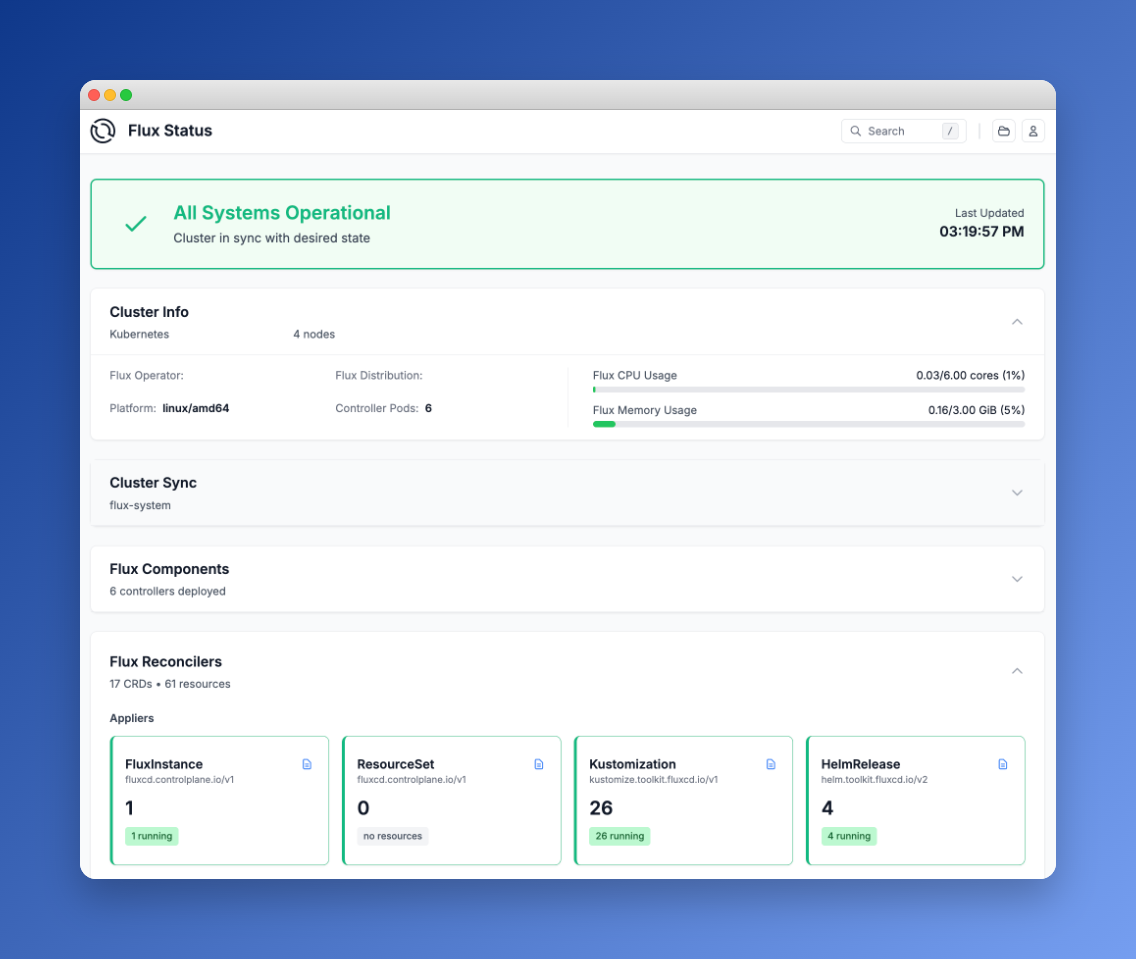
The dashboard provides:
- Cluster status overview — sync state, controller health, resource usage
- Flux Reconcilers — live status of all Kustomizations, HelmReleases, and sources
- Workload monitoring — deployment status and replica counts across the cluster
- GitOps graph — interactive visualization of resource dependencies
- Search and favorites — filter by type, namespace, or status
- Operational actions — trigger reconciliation, suspend and resume resources (guarded by RBAC)
To access it via port-forward:
kubectl -n flux-system port-forward svc/flux-operator 9080:80Then open http://localhost:9080 in your browser.
Securing the Web UI
The Web UI supports several authentication modes. For production use, OpenID Connect SSO is recommended — the operator integrates with Dex, Keycloak, Microsoft Entra, and other OIDC providers. This ensures only authenticated users with the right Kubernetes RBAC roles can view or interact with the dashboard.
For internal or development use, anonymous authentication is available with a dedicated RBAC user bound to a read-only ClusterRole. If you go this route, make sure the UI is only accessible via port-forward or behind a VPN — never expose an unauthenticated dashboard to the internet.
Here’s an example of a minimal read-only ClusterRole for the Web UI:
resource "kubernetes_cluster_role" "flux_web_view" {
  metadata { name = "flux-web-view" }

  rule {
    api_groups = ["source.toolkit.fluxcd.io"]
    resources  = ["*"]
    verbs      = ["get", "list", "watch"]
  }
  rule {
    api_groups = ["kustomize.toolkit.fluxcd.io"]
    resources  = ["*"]
    verbs      = ["get", "list", "watch"]
  }
  # ... similar rules for helm, notification, image, fluxcd CRDs
}
Flux MCP Server: AI Meets GitOps
The Flux ecosystem also includes an MCP Server — a bridge between AI assistants and your Kubernetes clusters using the Model Context Protocol. This lets you interact with your GitOps infrastructure through natural language in tools like Claude, GitHub Copilot, or Gemini.
What the MCP Server enables:
- Status understanding — ask your AI assistant about the current state of Flux resources, sync status, and controller health across environments
- Environment comparison — compare Flux configurations between dev, staging, and production clusters
- Incident response — reduce mean time to resolution during outages through contextual analysis of events and logs
- Root cause analysis — correlate events, logs, and configuration changes to pinpoint failure sources
- Pipeline management — trigger reconciliations, suspend or resume Flux resources through natural language
- Visualization — generate dependency diagrams mapping your Flux delivery workflows
The server implements sensible security defaults: a read-only observation mode, automatic masking of Kubernetes Secret values, and operation within your existing kubeconfig permissions. It also supports Kubernetes impersonation for scoped access.
If you’re already using an AI coding assistant, the Flux MCP Server turns it into a GitOps-aware operations companion — no more context-switching between your editor and kubectl.
Links:
Licensing
It’s important to understand the licensing landscape:
| Component | License | Notes |
|---|---|---|
| Flux CD | Apache 2.0 | CNCF Graduated project, fully open source |
| Flux Operator | AGPL-3.0 | Open source, copyleft — any modifications must be shared |
| ControlPlane Enterprise Distribution | Commercial | Enterprise support, hardened images, CVE patches |
Flux CD itself is Apache 2.0 — the most permissive open-source license. You can use it, modify it, and distribute it without restrictions.
The Flux Operator uses AGPL-3.0, which is still open source but with a copyleft requirement: if you modify the operator and provide it as a service, you must release your modifications under the same license. For most users who simply deploy the operator without modifying its source code, this has no practical impact.
ControlPlane offers a commercial Enterprise Distribution for organizations that need enterprise support, hardened container images, and guaranteed CVE response times.
What We Gained
Migrating from Flux bootstrap to the Flux Operator gave us:
- No more 660KB generated YAML — the FluxInstance CRD is ~50 lines
- Declarative Flux upgrades — change
version: "2.x"and the operator handles the rollout - Terraform-native — the entire Flux lifecycle is managed alongside the Kubernetes cluster
- Built-in observability — the Web UI provides instant visibility without additional tools
- Platform-specific patches — GKE Autopilot seccomp profiles and resource tuning in one place
- Secret decryption as config — SOPS/Vault/KMS integration is part of the FluxInstance spec, not a manual overlay
Getting Started
If you want to try the Flux Operator:
# Install via Helm
helm install flux-operator \
  oci://ghcr.io/controlplaneio-fluxcd/charts/flux-operator \
  --namespace flux-system \
  --create-namespace \
  --set web.enabled=true

# Create a FluxInstance
kubectl apply -f flux-instance.yaml

# Access the Web UI
kubectl -n flux-system port-forward svc/flux-operator 9080:80
Check the Flux Operator documentation for the full FluxInstance spec reference and advanced features like multi-tenancy, sharding, and horizontal scaling.
Further Reading: